7 Things To Take Your Gravel Riding To The Next Level
We’ve already written about the basic gear you need for your first gravel ride here, but what if you’re not entirely new to cycling or if you’ve already been riding gravel for a bit, and are ready to upgrade your experience? Here’s our list of 7 things that will make your riding more fun & hopefully take you even farther! I’m sure we’re missing things too, so let us know in the comments what some of your favorite upgrades have been!
Disclaimer: We haven’t been paid to promote any of the products mentioned; we can either vouch for them through experience or we think they sound promising. So, LET’S GO…
1 — Get A Gravel Bike.
Do you “need” a gravel bike to ride gravel? No, of course not. But if you’ve been out riding on a hybrid or a road bike with the fattest tires you could squeeze in, or even that old bike from your garage, then upgrading to a proper gravel bike will open a whole new world!
Key features of a gravel bike are drop handlebars (which give you multiple hand positions), disc brakes (better stopping ability), and clearance for fatter, knobbier tires (better traction, cushion, and handling). Many gravel bikes also have a number of mounts on the frame for extra water bottles, mudguards, fenders, racks, etc, so the longer you’re out adventuring, you can be sure to have everything you need! My gravel bike is also my “road” bike — or all-road bike as I like to think of it, so don’t think you can’t also ride your gravel bike around town or on group rides too.
Check out this post and this post for tips on navigating the bike shop and purchasing your first bike, and this post with some things you should ask before leaving with your new bike. And if you’re still not exactly sure what kind of bike you should get, then check out this post that answers some common questions about the differences between mountain bikes and gravel bikes.
2 — Get A New Helmet
Any helmet will do when you’re just starting out, but investing in a good helmet is a really smart idea when it comes to any kind of off-road bike riding. Gravel riding usually entails remote locations with spotty service, so you want to protect your head as best as possible in case of an accident! Look for helmets with “MIPS” or similar technology. There are a ton out there, and to make it easy, here are some options at REI and at Dick’s Sporting Goods. I have a POC helmet with their SPIN technology, which is similar to MIPS.
And if you really want to cover all your bases, Specialized makes a crash sensor for just $50 that you can attach to your helmet, and not only will it detect if you’re in a crash, but will alert your selected contacts of your GPS location with a message that you need help. If it detects a crash, but you’re OK, then you can just turn off the alert. You can also use the app to set your designated ride time, and if you’re not done in the allotted time, it’ll send a message to your selected contacts with your last known GPS location.
3 — Go Tubeless.
What does that mean exactly? Tubeless tires are just what it sounds like... tires without the tubes inside keeping them inflated. Instead, the wheel rim itself is taped up and a special sealant is injected into the tire to fill any holes and block air from escaping. For the most part, you need tubeless-ready wheels and tires to be able to this (though not always, just ask your bike shop), but many bikes, even entry-level bikes, come ready to be set up tubeless these days but leave the shop with tubes, you just have to ask your shop to do it! This is one of my top recommended upgrades for new riders because you get so much bang for your buck... At my LBS here in Atlanta, it only costs about $50 total ($25/wheel for parts & labor) to convert to tubeless & it can usually be done on the spot or with a very quick turnaround. And running tubeless tires comes with HUGE improvements in ride quality.
So what’s so great about tubeless? It allows you to run lower tire pressures, which will make riding on rough roads much more comfortable, stable, and confidence-inspiring. Tubeless tires are also less prone to flats because there’s no tube to get pinched & deflated. Even if you happen to get a small puncture from sharp rocks or other debris in the road, you can usually just keep on riding and the sealant will do its job.
On rare occasions you might get a puncture that is too large for the sealant to fill but never fear, there are tubeless puncture kits with “plugs” you can quickly stick into your tire to literally plug the hole, so the sealant can fill in around it. The plug kits are inexpensive (I got this one on Amazon and it’s saved me numerous times) and small enough to easily fit in most saddlebags or wherever you keep your spare tools. I also recommend carrying a frame pump on your bike for gravel, so you’ll never be without a way to pump up your tires on a long ride. Plus CO2 isn’t always super compatible with all sealants, so a frame pump is a good idea. I have a Crankbrothers Gem that lives on my gravel bike, but there are a bunch of options.
Here’s a video explaining some benefits of tubeless tires & how to plug a hole. It’s SO MUCH easier than having to replace a tube on the side of the road!
4 — Upgrade Your Cycling Kit.
You can start off riding in whatever athletic apparel you already have if you don’t want to invest in expensive cycling clothes right off the bat, but it’s worth adding at least a few cycling-specific pieces of clothing to your wardrobe to make your riding more enjoyable.
There’s a lot to consider when it comes to cycling clothes, but the main things are the material & the chamois pad. You want your cycling clothes to be tight & form-fitting, but also allow a good range of movement, and be comfortable & breathable. And perhaps most importantly they need to have a good chamois pad! More about that and some other clothing specific thoughts here! Another benefit of cycling-specific clothing is that most, if not all, of it is going to include plenty of handy pockets for stashing snacks, a credit card & cash, your phone, or whatever else.
Cycling-specific clothes can be a bit pricey, but in my experience, it makes more sense in the long run to spend the money on quality clothing initially b/c not only will it perform better, but it will also last longer. The alternative is scrimping on cheaper options, which can wear out sooner so you end up having to replace them sooner, but also may not be as comfortable, leading to less enjoyment on the bike, and ultimately that’s what we’re all after!
Another issue with a lot of cycling clothing is that *many* brands don’t really make clothes for real women’s bodies... “Shrink it and pink it” is still a really pervasive problem in the industry .... So finding stuff the fits well on all body shapes and is comfortable can be a challenge. Two companies we highly recommend checking out are Machines for Freedom and Velocio. They’re not sponsors or anything and we get nothing from promoting them, but both are great companies who design clothes for all shapes and sizes. Plus, they’re also all about inclusivity and diversity, so that’s another win!
Ok, let’s talk bib shorts — I’ve been riding for years, and have always been staunchly anti-bibs. I don’t care how great they feel riding or how “pro” they are, if I have to basically disrobe to pee, then I’m out! Until I tried the Velocio fly-free or Signature Fly bibs... You literally just pull them down like any other shorts; they have seriously been life-changing! They’re on the pricey side, but Velocio has regular sales and a lot of great kit in the “final sale” section of their website, so check them out!
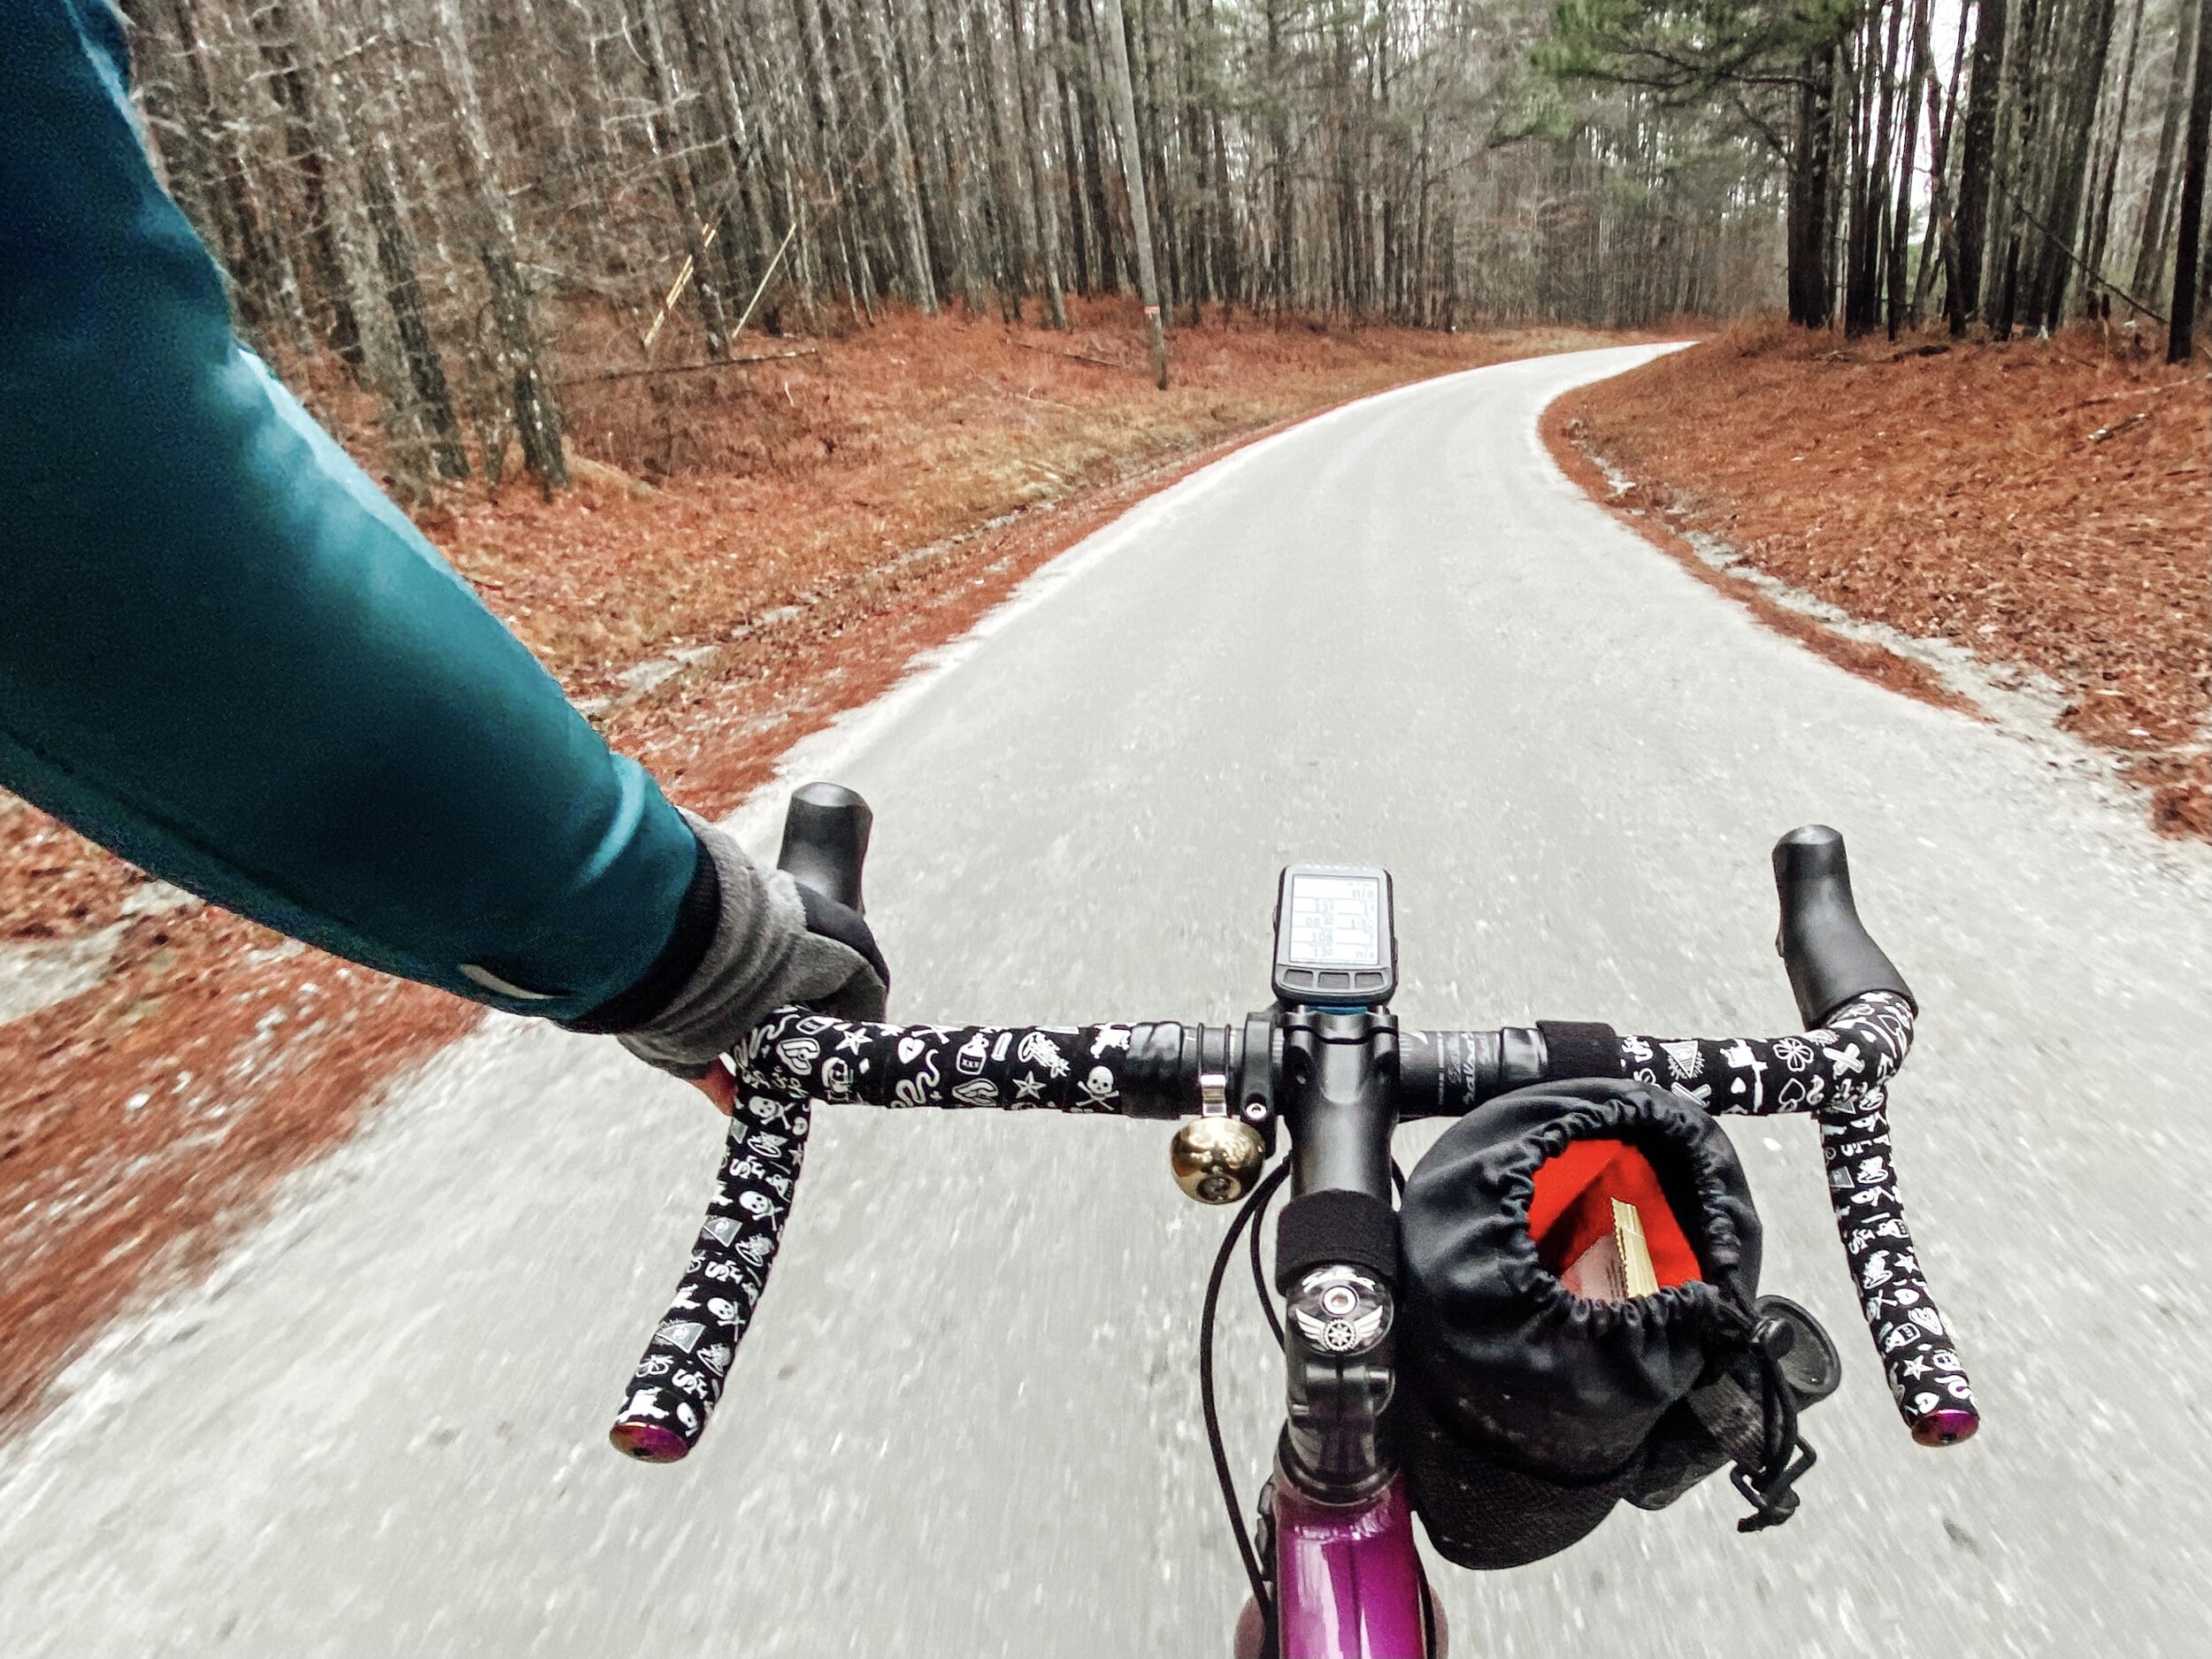
5 — Invest In A GPS Bike Computer With Turn-by-Turn Navigation.
If you plan on riding by yourself, then this one is really essential! Unless you happen to be a wiz at maps and never getting lost, I don’t know how anyone gets by without GPS on long rides in rural places, where everything looks the same! I use a Wahoo Elemnt Bolt, and it has saved me on more than one occasion! But there are a number of others out there too from Garmin, Polar, Lezyne, and more.
I know some people use their phones, but to me, that’s a very high-risk option that leaves you completely reliant on your phone’s battery life, which we all know can be hit or miss. The last thing you want is to be stranded in the middle of nowhere with no way to figure out how to get back to your car and a dead cell phone! The battery life of many bike-specific GPS computers is easily 10-15 hours, so you can be out all day without any issues!
There are also some great GPS resources to help plan routes that you can then upload directly to the computer. I use Ride With GPS (the premium version) because it’s fairly easy to search for rides & routes, save them (a lot of races post their routes there too), then upload them to your device, which is where the turn-by-turn navigation comes in. It’s just like using Google Maps or Waze in your car, but on your bike! For route planning, there’s also Komoot and others, but I haven’t deviated from Ride with GPS yet.
Another benefit of a lot of those types of bike computers is that some of them also have “live tracking,” which means that your spouse or partner or families or whoever can follow your progress while you’re out riding and will know if you haven’t moved for a while and might be in a ditch, and they’ll also know exactly which ditch and how to get to you!
6 — Convert To Clipless Pedals
We wrote about this in the “Basics” post too, but a lot of people don’t start off riding with clipless pedals — and that’s OK! — but going clipless (yes we know the name makes no sense) is often one of the first upgrades many riders make to improve efficiency, comfort, and speed. We recommend something like the Shimano SPD system or Crank Brothers pedals & cleats. Both are designed without too many moving parts that can be gunked up with dirt and mud, and both systems are fairly quick and easy to clip out when you need to. I’m sure any bike shop would be happy to walk you through all your options, but here’s a good article if you want to really delve into pedals!
And related.. Shoes! More and more companies are coming out with gravel-specific shoes (I have the Fizik Terra Powerstrap shoes and highly recommend them!). But if not gravel-specific, then anything with a recessed cleat will do because “hike and bike” — meaning you’re walking your bike, often up a hill or across a creek crossing — is common, so you want shoes where the cleat is recessed up into the sole of the shoe, so it won’t impede your walking as much as traditional road shoes might. Plus, at least in the case of the Terras, they dry out super quick after getting soaked!
7 — Get a Camelback or similar vest with a hydration bladder
Gravel riding can be dirty and dusty, so it’s highly likely that when you go to take a swig from your water bottle, you’ll get a mouthful of dirt as well! To avoid this, you can get something to cover your bottles... or... you can get a Camelback or similar option, which will hopefully keep you from dirking too much dirt since the spout will be a lot higher off the ground. I also find it easier to stay on top of hydration on long rides when I don’t have to lean over to grab a bottle on a rough road.
Plus you can carry a lot of water — or whatever hydration mix you use — when it’s in a vest vs. just what you can carry in bottles. For anything in the five-hour ballpark, I usually have my Camelback and two bottles (plus all the snacks!). Anything less than three hours is usually just two 24 oz. bottles (and still snacks lol). The vests come in varying shapes and sizes, so you can pick one that will match how much you want to carry.
Also, for what it’s worth, I’m not a big frame bag person; I usually only run one crusher-style handlebar bag & that’s it. I might run two for really, really long rides b/c that’s what works for me, but I’ve also never done anything as long as say the Unbound 200. Camelbacks have extra pockets for storing snacks too if you don’t want to have a bunch of packs on your frame.
Ok, that’s my list! I’m sure there are others, so let us know in the comments what other things you’ve found that helped take your riding to the next level!